In this article we will discuss the utility of blocks.
As you know, CADopia allows you to create drawings using standard object types such as lines, arcs, circles, and text. There are many situations when you need to create the same group of objects over and over again. The plans for a hotel, for example, might include 1000 instances of the same sink. After drawing one, you can use the COPY command to avoid redrawing the others, but there is a better way. It involves the use of a special object type called a block.
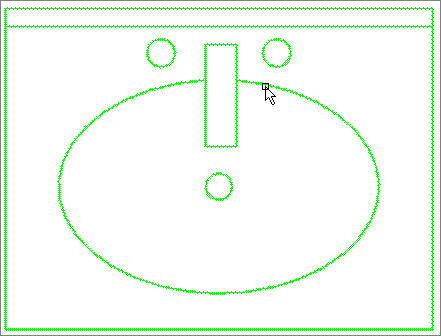
A block is a collection of objects grouped into a single super object. You can create a drawing of a sink that contains several lines and arcs. You can then group them into a new object called a sink that you can copy, move, rotate, erase, and so on as though it were a single object. In the same way that children build houses out of building blocks, you can now build house plans by building them up from blocks of standard details such as doors, windows, and sink.
We will begin by explaining the advantages of using blocks.
Blocks save space
The first advantage is space savings. Let’s say you’re drawing a 1000-room hotel. The detail for a sink might occupy 1 kilobytes (Kb) of disk space. If you then copy it 1000 times, the drawing file is 1000 Kb larger, just to show the sinks.
On the other hand, if you make a block of the sink, the block definition occupies about 1 K, the same as the individual components. The difference is that each subsequent insertion only occupies about 100 bytes, regardless of the size of the block. These days a few megabytes of disk space may seem relatively trivial, but a larger file also takes longer to load and regenerate.
Blocks save time
The next factor is work savings. You only need to draw a detail once. Not only can you replicate it within the current drawing but you can also easily share it with other drawings that use the same detail. Another advantage is ease of editing. If it becomes necessary to change to a different sink then you only need to revise the definition to automatically update all the sinks in the drawing.
Blocks have attributes
Finally, we come to attributes. You can hang a tag (or even several tags) onto a block. This tag object is called an attribute and it is a special kind of fill-in-the-blank text object.
Each time you insert a block with an attribute into your drawing you specify some text to display as part of the block. You can thus easily attach name tags, part numbers, catalogue numbers, and prices, and so on onto the block. You can also extract attribute values and save them as a separate file. For example, having finished your hotel plan, you can then automatically generate the hardware schedule based on the attributes attached to the block insertions.
Making the blocks
To make the block, type makeblock on the command line, or pick from the toolbar or pick Draw menu, then Block > Define. Block Definition dialog appears as shown below.
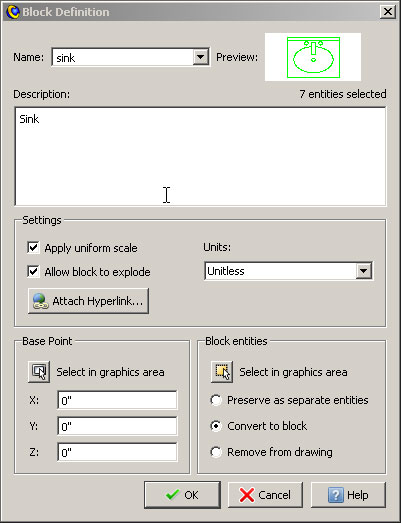
Give a name to your block. Use a suitable base point for the block. You can also select the base point on the drawing window. Click on ‘select in graphics area’ in the block entities section. Select all the entities that you want to be part of this block. Check uniform scale and uncheck ‘Allow block to explode’. Click OK button and your block is ready for use.
Inserting the blocks
Now that you’ve created the block definition it’s time to move on to step 2 of the process: insertion. You can type insert at the command line or choose Insert Block from the main menu. The Insert Block dialog box appears, as shown below. Let’s investigate this dialog box from the top down. If you click on the Name dropdown list, it displays a list of all block definitions currently available in the drawing.
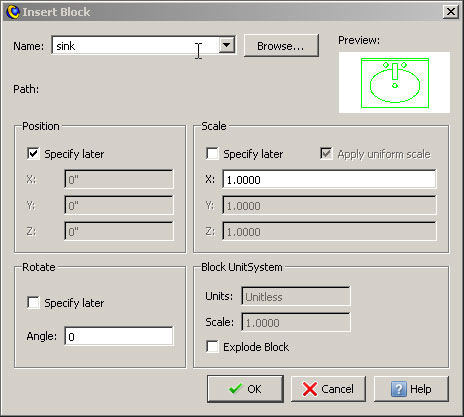
You can either specify the position, scale, and rotation values in the dialog or in the drawing window. If you need to maintain the aspect ratio of the block at all times, then you can specify uniform scaling option at the time of creating the block. Selecting this option ensures that the block is scaled uniformly at all times. Likewise, the ‘Explode block upon insertion’ check box can be selected, then the block is exploded into its component entities upon insertion.
When you click OK, the dialog box disappears and CADopia requests an insertion point for the block while it displays an image of the block at the cursor. You can drag the image around until you find a suitable location for the insertion. Once again, object snaps are useful to properly specify the insertion.
That’s it! If you want another insertion of the same block you can just press the [spacebar] or the [Enter] key. This repeats the INSERT command and offers the previous block name as the default. Click OK and specify the insertion point.
We hope you have found this article useful. If you have questions or comments, please send them
to support@cadopia.com.